|
Secret Files: Tunguska
Secret Files: Tunguska is an inventory based third person adventure. It features amazing graphics, a gripping story, and McGyver-like puzzles.
I played the U.K. version 1.00 of Secret Files: Tunguska to write this walkthrough, and experienced no problems. Unfortunately, this will not be the case for players of the North American version, who apparently cannot complete the game without a patch (a certain puzzle in the middle of the game is unsolvable). To remedy this situation, Google for the version 1.02 international update. Several sites are hosting it. But beware, for it's a monstrous 240MB download!
To examine any item that exhibits an 'eye' icon, just right-click on it to receive a description. Likewise, items that you can interact with (or combine) will exhibit a 'hand' icon. It's that simple.
If you don't like hunting for miniscule hotspots, then the designers had you in mind. Either hold down the space bar (or use the magnifying glass icon in the inventory) to see all items that you can interact with, and all room exits, highlighted!
As this is an inventory based adventure, remember to try every object on every other object when you get stuck. Sometimes even the most unlikely objects will work together.
Throughout the course of the game, be sure to keep a close eye on Nina's journal. It documents what has been happening to her, and you can even use it to get spoilers for the few non-inventory (abstract) puzzles.
The game capitalises the first word of objects, and puts the rest in lower case. Example: 'Glass of water'. While this works fine in the context of the game, it's difficult to distinguish objects this way in a walkthrough, so... I took the liberty of capitalising each word, thus: Glass Of Water.
Whenever an important object appears in your inventory or a scene for the first time, I put an invisible marker for it there in the walkthrough. Then, later on when you need to use this object, I provide a link back to where you were supposed to have obtained it. That way, you can just nick into the walkthrough and read small excerpts of it when you are genuinely stuck, without having to spoil your whole game by reading the walkthrough from the very start, scanning for a particular object.
After the intro, Nina arrives at the museum to find her father missing, and his office ransacked. You start off with just a Key Ring in your inventory. Have a look around, and examine everything that exhibits an 'eye' icon. You need to pick up three items: a Piece Of Rock and a Porcelain Bowl from the table in the centre of the room, and a Photo from amongst the broken glass on the floor by the open window. Nina automatically puts the Photo in her diary. You can also have a look at the coin showcase, but nothing you can do with this yet. Use the telephone to call the police. Hmph. Not much joy there. Now exit to the hallway.
You notice loud music coming from the office to the left, but the door is locked and the person inside can't hear you knocking due to the music. Note the name on the nameplate to the right of the door: Max Gruber. While you're here, take a Piece Of Plant from the potted plant. Exit to the right now to enter the display area of the museum. Go to the rear area, and examine the base of the tyrannosaurus rex display (statue) to reveal a secret door. When you open this door, out pops a rather frightened Eddy, the caretaker. Once he's left, take the Key from the floor of his hiding place. Go back up the stairs, and use the Key on the fuse box across from Max's office. Hmm. The fuses inside the box are numbered, and you have no idea which number corresponds to Max's office. Go back downstairs, and have a look at the list on the wall all the way to the left. Aha. Max is in office number 4. Now you can go back to the fuse box and kill his power. He opens the door to let Nina in. Speak to him on all available topics, and then you wind up outside his office. Return to your father's office, only to find the very unpleasant Detective Kanski there. Strange, the police didn't seem all that interested when you called earlier, so why the sudden turnabout? After a brief and fruitless conversation, he basically turfs you out onto the street where you meet Max once again and promise to touch base later. Use Nina's motorcycle to head back to her father's house. It's been ransacked too, and Nina gets a nasty surprise upon entering the bedroom...
Take the Book from the closet drawer that has been left on the bed by the intruders. Examine it in inventory, and it turns out not to be a book at all, but rather a locked Book Casket (small chest). Have a look at the fish tank on the right-hand side of the room. Nina spots a key in there, but she can't reach it through the grating at the top of the tank. We'll have to find another way to retrieve the key. Lift up the bottom left corner of the carpet to reveal a gap in the floorboards. But we need something to pry it open with. Pick up the portable cassette player from the floor next to the closet, and examine it in inventory to obtain some Batteries. Now have a look at your father's desk. Take the Pizza and the Salt Shaker. You can't do anything further here for the moment, as the computer requires a password that you don't have any clues for yet, so exit. Go outside and rummage around in the garbage bin. You retrieve a Rubber Glove and a Spoke. Also get the Air Pump from the old bike. Use the bucket under the drainpipe, and you obtain the Handle that falls off it. Also note that the bucket is full of water. While you're here, use the Key Ring in your inventory on the motorcycle seat to obtain Nina's Cell Phone and Sunglasses, and get the Double-sided Tape and Glue from the crate in the garage. Now go back inside.
Use the Spoke on the gap in the floorboards to pry it open, and you find a Cassette. Access your father's desk again, and use the Cassette on the cassette tape recorder to load it. Then use the recorder to play the tape. Your father says: "The first and last on the car, a fourth of the openings in the entrance to the underworld, and finally, the guardians of my work." Hmm. Seems like clues to the password for the computer. Back outside then, and note the first and last digits on the number plate of the car: 2 and 3. Counting the number of holes in the sewer grate ("the entrance to the underworld") yields 16, and a fourth of that is 4. Finally, "the guardians of my work" probably refers to the 2 saurian statues that guard the museum entrance. So the password is: 2342. Access the keyboard of your father's computer, enter this sequence, and you're in! Look at the monitor, and Nina sorts through her father's files until she spots an e-mail that her father sent with the subject "Tunguska". Interesting. Now we have to track down this Oleg person. Head back to the museum next...
A girl is now asleep on the bench in front of the museum. Talk to her, and you find that her name is Lisa. Both her bike and her camera are non-functional. It appears that she may have taken a picture of the hooded figures last night, so you really need to get a look at her camera. But she doesn't trust you enough yet. You must fix her bike first, and then she'll let you have a go at her camera. Pick up a Yellow Shard from the ground in front of the construction area to the right. Then take the Flat Tube from Lisa's bike, and head back to your father's house. Examining the Flat Tube in inventory reveals what you need to do in order to repair it. Right. So use the Air Pump on the Flat Tube to inflate it, then immerse it in the bucket under the drainpipe to find the leak. Combine the Glue with the Rubber Glove to obtain a Sticky Rubber glove. Finally use this rudimentary patch on the tube to get a Patched Tube. Go back to the museum and use the Patched Tube on Lisa's bike to repair it. Then speak to Lisa again. She now entrusts you with her Camera. Just use the Batteries on it, and Nina has some more Photos for her diary... but they don't shed too much light on what happened last night, except to prove that Eddy wasn't seeing things. Give the Camera back to Lisa, and... you get a fridge Magnet in the shape of a hamster as your reward :- More useful than it first appears though. Take it back to your father's house and use it on the fish tank to obtain another Key. It is this Key that allows you to open the Book Casket, which contains Vladimir's Address Book and a Note. Examine Vladimir's Address Book to find the address of Oleg Kambursky. Head for there next.
Pick up the Plastic Bag next to the telephone booth. Then head for the front door and ring the doorbell. Oleg comes to the door, but he won't engage Nina in conversation. Take the path around the back of the house, and look into the window slit. Oleg has called someone, and no doubt it's to relate the news of Nina's unexpected visit. While you're there peeping into the window slit, be sure to note the feeding dish on the floor. On the way back to the front of the house, take the Broomstick that is leaning against the wall. Now when you return to the front door, there's a cat there. Put the Pizza in the feeding dish to distract the little critter, and now it's time to really play McGyver! Use the Double-sided Tape on the Cell Phone, then stick this ensemble to the cat. Use the Salt Shaker on the Pizza next, and this causes the cat to make a hasty retreat back into the house. Nina peeks into the window slit again to confirm that the cat is frantically sipping away, all the while recording Oleg's conversation. Then go to the telephone booth out front and call your cell phone. Oops. The vibration frightens the cat so much that it runs up into the tree. Your phone is left sticking to a branch quite far off the ground. No fear. Use the Handle on the Plastic Bag to hold it open. Then when you use the Broomstick on this item, Nina automatically applies some Double-sided Tape to construct a... Brailer?! (I'm guessing this is German for something like 'butterfly net' :-) Anyway, use the Brailer on the glinting spot up in the tree to get Nina's Cell Phone back, and... the mystery only deepens, I'm afraid. Then it's back to the museum once more to confer with Max.
Go to Max's office, and converse with him on all available topics. During the conversation, he gives you the Diadem that is referred to in your father's Note. After the conversation, examine the Diadem and you notice that all three precious stones are missing from it. Might as well have a look at the Note now. The three missing stones are an emerald, a ruby, and an amethyst. There is also this cryptic phrase: "The diadem will reveal the true princess, and she will realize that money is not the greatest treasure." Unfortunately, that's an awkward translation. It should be something more along the lines of: "The diadem will reveal a great treasure to the true princess, and she will realize that it is not money." Since Max has now left to go rummaging through the archives for information concerning Tunguska, you can now pilfer his refrigerator. That exercise nets you an Acid Bottle and a Cement Bag. Hmm. Looks like we have the makings of a fake diadem here. Go to your father's office and use the Porcelain Bowl on the radiator vent to fill it with water (assuming that you haven't already filled the bowl with water from another source). Then combine this item with the Cement Bag and the Piece Of Plant to obtain Putty In Porcelain Bowl. Finally, use this item on the Diadem. Now it's ready for mounting the stones. Combine the Sunglasses with the Yellow Shard to produce a Green Shard. For our purposes, that will do as an emerald, which you can now place in the Diadem. Now take the Flask from the machine to the right in your father's office. Combine with the Acid Bottle, and then the Piece Of Rock (that you've been carrying around for the whole game) to produce a piece of Amethyst, which can now also go into the Diadem. Now we just need to find a ruby, or something like a ruby. So have a look at the totem in Max's office, next to the fridge. There's a red glass eye embedded in it. Use the Spoke to pry it out, and use this Red Glass Bead to complete the fake Diadem. Now head back downstairs to the exhibit hall...
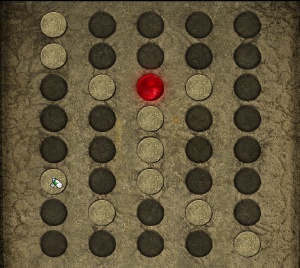
Note the lamp on the wall partition all the way to the right. Use the Diadem on the lamp to produce a startling Indiana Jones-type lighting effect that shines on the plan directly across from it. Now when you examine the plan, you see that room #8 has been marked with invisible ink. After you exit the view of the plan, Max reappears and presents you with two interesting articles about the Tunguska event. He then takes you to his office, where he says all of the contents from room #8 are now residing. Head straight for the relief disk in the centre of the room. About a third of the way up from the bottom there is a Coin that you can pluck out of the disk. Take this Coin back to your father's office and access the coin showcase. Hey, it's the one that was missing! You need to arrange the coins so that each type of coin only appears once in each vertical, horizontal, and diagonal row. There are many ways to do this. One possible solution is shown here, just before the final swap is made (the coin in the top right corner with the one two slots below it).
Once the coins are correctly placed, a secret compartment opens at the bottom of the showcase, revealing a journal. What follows next is a verrrry long exposition. Suffice it to say that Nina winds up in Moscow, ready to begin the next chapter in the search for her father.
Drat! The guard Sergej had bribed to let Nina into the train station has been found out, and another non-sympathetic guard has taken his place. You wind up outside the station, next to an abandoned VW van. Talk to the sewer worker on all topics. You find out that he's pretty pissed off with having to work on his day off. But you also learn that he's a dedicated lottery player, and his numbers are 856549. Pilfer his bag next, and you get a Bread Box. Examining this reveals some Bread And Butter and a Rubber Band. Rummage around in the rubble behind the van, and you recover a rusted Nut, and an Unidentifiable Thing that looks... sort of familiar. Sure enough, combining the Rubber Band with this item yields a Slingshot. Take the Bricks that are lying on the ground behind the sewer worker, and use them to prop up the car (van). Use the Bread And Butter to lubricate the Rusty Car Jack, and now you can take the Car Jack. That's about all we can do here for the moment, so head around the corner to the station entrance.
Pick up a Pebble from the ground to the right, and then make sure you look at the cigarette butts that are on the ground near where Sergeant Yushin is sitting. Then speak to him on all topics, and you will obtain a Cigarette. Now combine the Pebble with the Slingshot, and use it to shoot out the lamp above Sergeant Yushin's head. Now you can take the Newspaper :-) On the right-hand side of the guard hut there is a Pencil. Use it on the Newspaper to alter the the winning lottery number to be that of the sewer worker's (you only have to change a 3 into an 8, so he won't notice). Now go show him the paper. He runs off in an ecstatic mood, leaving you alone at the sewer entrance. Use the barrier to obtain two Iron Bars and some Barrier Tape. Then pick up the Hose and enter the sewer (canal). There are some Matches on the ground here. Use the Car Jack to prise open the jammed metal door. You can't use the two Iron Bars to complete the ascent (ladder) yet, because they aren't the correct shape to fit into the curvature of the shaft. So head back to Sergeant Yushin, who will bend them for you. Handy guy. Now you can use them to get up the ascent and into the station...
Nina winds up in the men's room of the station. Nice. Examine the opening at the bottom of the last stall, and then touch the legs you see there. Turns out to be the train driver. He's lost the key to the train down the toilet, and now the train can't leave the station until this key is located. Nina promises to help him out. Exit to the passage on the left-hand side of the sink. This triggers a scene whereby the young woman officer Romanova gets a promise of a smoking break from one of her superiors. Once he leaves, light the Cigarette with the Matches and stick it in the dish on the end of the bench. Hope that doesn't get her into too much trouble! Once they've left, the coast is clear and you are free to explore the locker room. Access the locker closest to the door to obtain: a Stocking, a Radio, an Envelope, and a Uniform which Nina promptly changes into. This should allow you to explore the station further without being so conspicuously dressed as a civilian. Examining the Envelope doesn't really tell you much that you don't already know. The next locker down has a 5-digit combination lock. Hmm. Exit through the door into the train station proper. Note the two 'men in black' guarding the door in the storage area. Talking to them gives you the idea that they are probably holding Sergej's man (Solotov) in there. Head out to the train next, and talk to the soldier on all topics. When he radios the announcer to page the missing train driver, you learn that the soldier is station #17, and the announcer is station #48. You also learn that you will need to have a special permit in order to board the train. OK, let's go find the poor train driver's lost key.
In the men's room, attach one end of the Hose to the faucet, then pick up the other end and put it into the urinal. Turn on the faucet, then go into the room underneath and look into the distributor. There's the key! Now we need to go rig something to catch it with or it will just wash into the sewers when we turn the wheel next to the distributor. Exit to the sewers and note the pipe next to the door. Attach the Stocking to this pipe, and then secure it with the Barrier Tape. Now you can operate the wheel to release the key. Take the Stocking With Key and present it to the train driver. Now we need more information in order to use the radio. Head back outside and talk to Sergeant Yushin again. You manage to coerce the names of the two FSB guys out of him: Fetisov and Radenkov. Back to the locker room next, and look at your Radio. You note that you are station #15. Use the Radio on Nina, #15, calling station #48. You request that the FSB agents be sent to the train. Now that the coast is clear, you can enter the room where Solotov is being held. Search his unconscious body to recover his Dog Tags. Examining them reveals his service number: 31545. You can now key that number into the 5-digit lock back in the locker room. Surprise, surprise. The locker contains just one item: a travelling Permit in the name of your new alias, Nina Perkova. Now you can board the train...
You wind up standing next to a sleeping soldier who bored you to death earlier. Take the Bottle Of Orange Juice and Dried Fruit from the table. Then go into the small kitchen to the left, and get the jar of Honey. Exit this compartment, and you find a scientist and his assistant in the next one. Speaking to the assistant reveals that the scientist gets very cranky unless he gets his bread and jam... regular, like. So take a slice of White Bread from the basket on the table, and then head back to the kitchen. Put the Bottle Of Orange Juice, Dried Fruit, and Honey into the pot on the stove to produce a Pot With Jam. Then dip the White Bread into it to obtain White Bread With Jam. Present this item to the scientist, and now you can speak with him. You learn that there is a Professor Sidorkin who is in charge of all the scientists, and he has a list of those on board. But he too is irritable for some unfathomable reason. Go through the next door into Sidorkin's comparment. The door to his room is locked, and using the intercom to speak to him gets you no joy either. Gosh, he is irritable! Take the 100 Watt Bulb from the fixture above-right of the door, and head back to the sleeping soldier.
Replace the 25 watt bulb above the soldier with the 100 Watt Bulb that you just procured from Sidorkin's comparment, and hit the light switch. Nina scurries into the kitchen as the angry soldier awakens. When you go back out, the soldier's bag is now accessible. Get the Castor Oil from it. Now go into the kitchen and use the Castor Oil on the Pot With Jam to produce a Pot With Laxitive Jam. While you're here, use the Empty Bottle (that earlier contained the orange juice) on the Faucet to obtain a Bottle Of Water. Now return to the scientist's compartment and nick another slice of White Bread. Use the White Bread on the Pot With Laxitive Jam to obtain a slice of White Bread With Laxitive Jam. Use this item on the scientist to make him disappear to the toilet, pronto like. Now you can use the Bottle Of Water on the power outlet (on the floor near the incinerator), and when the assistant goes to check the fuses, Nina is finally left alone in the compartment. Take the Glass from the desk, and also the one from the container on the floor. You now have two of the Plant Sample In Jar in your inventory. Examine both of them to remove each Plant Sample from its respective jar, then combine the two Plant Samples, and put the results back into one of the jars. When you then place this item that you tampered with back onto the desk, the assistant returns and thinks that his experiment has miraculously succeeded. The three scientists confer to discuss the results, and Nina sneaks into Sidorkin's office while they're nattering away.
Have a look at everything on Sidorkin's desk, noting the locked drawer. Of most interest is the book, which documents the fact that the Tunguska Project is being targeted by mysterious figures dressed in black robes like Eddy saw at the museum. Might even be a religious sect. Once you have examined all the objects on the desk, one of the FSB goons enters and takes Nina into custody... you wind up locked inside a compartment with a nasty Doberman. Fortunately, he's caged. You need that bone at the bottom of the cage, but of course you can't just take it without him biting off your hand. So... walk to the other end of the compartment and take a Juicy Steak from the ice chest. If you just put this item into the right-hand side of the cage, that doesn't distract the beast long enough for you to be able to grab the bone. Take another Juicy Steak from the chest, and place it into the Sample Glass. Put this item into the cage, and that does the trick. Now you can pick up the Piece Of Bone. Take the Piece Of Bone down to the other end of the comparment, and use it to pry open the flap on the vacuum cleaner. Take the Vacuum Cleaner Bag, and examine it in inventory. You wind up with a Barette and some Animal Hair. Nice one. Also take the Tube and the Hose from the vacuum cleaner. Use the Tube to break the glass in the roof hatch. But Nina can't climb onto the roof yet for fear of being cut by the glass that remains in the hatch. Take the Dog Leash that is hanging on the front of the cage and combine it with the Tube to obtain a Leash With Pipe. Now you can use this item on the hatch to climb up to the roof of the carriage. Examine the pipe (there are two of them on the roof) that is furthest away from Nina, then put the Animal Hair into it. Now use the Hose to connect the two pipes, and voila. The scientists open the window to get some fresh air. Retrieve the Leash With Pipe from the hatch, and use this on the pipes to provide a means for Nina to climb down into the window. Whew, that was close! And now you can explore Sidorkin's office at your leisure.
Use the Barette on his desk drawer to get the fourth Statue. Take the Flower Vase, then put the Statue into the socket that was under the vase. Note the way the portrait of Lenin in the bookcase is facing. Turn all four statues to face the same way... and a secret door in the bookcase slides open. Enter the secret comparment, and take the Book from the torture chair. Go back to the office, and use this Book on the other pirate books to the right of the secret door. Nina hears something opening. Take the Skull from the skeleton, go back into the secret compartment, and place the Skull on the niche that was revealed when the flap opened. The painting swings open. Oh great, some twiddle-ware! You need to think of the lights as a series of crosses. When you click on the centre of each cross, all the lights in that cross are inverted. You need to get all the lights off. If you can't figure this one out, no fear. I've provided the solution here, the numbers representing the relevant cells, and the order you must click them in. Another big exposition scene follows, where Nina discovers that her father was most likely not on the train after all, and then winds up in hospital when the train is derailed by our mysterious friends in the black robes...
Oleg meets Max outside the military hospital where Nina has been taken, and now you take control of Max, the goal being to get Nina out of the hospital. Take the Textile Bag from the bench behind Oleg, and pick the Red Berries from the shrub next to the shelter. You can try using the intercom next to the gate, but the person on the other end soon dashes your hopes of trying to gain entrance with a tourist story. Examine the ambulance on the other side of the gate. Hmm. Use the Red Berries on the Textile Bag to make it look like it's covered in blood, then give this item to Oleg (he has two fingers missing from the incident where he tried to save Nina's mother, remember?) Now that you have a feasible pretence, you can call the ambulance and get them to come outside. Max winds up sneaking into a passage behind the hospital. Note the shadow on the ground that looks like an extreme close-up of a key. Hmm. Examine the lamp, and there is indeed a key in there, only it's really hot to the touch (and of course, Max is a sensitive 90's kinda guy. In other words, a wimp :-) Get the Surgery Pliers from the right-hand side of the trash container, and use these to get the Key out of the lamp. Now you can use it on the door to get inside.
Examine the dictation machine on the trolley, and Max listens to a doctor describing some disturbing patient symptoms before the batteries run out. Take the Handheld Fan from the top of the filing cabinets. Then look at the open drawer of files. Max reads about former Tunguska expedition member Manuel Perez's strange medical history, and discovers that he was sent back to his native Cuba only a few weeks ago. Now you know what they were sedating Perez with, so pick up a bottle of this Anesthetic from the shelf by the door where you entered. Exit the storage room into an operating room. Take the Ammonia Gas from the shelf next to the door, the Stethescope from the metal tray, and the Syringe and Scalpel from the table. When you try to exit through the other door, Max hears voices, and won't venture out until he knows what's being said. So use the Stethescope on the door to listen in. Hmm. Now you can exit this room. The guard is sitting across the room watching a soccer (football!) match on the TV. Max refuses to budge while he's there, afraid of being noticed. We'll have to find a way to distract the guard. So go all the the way back outside to the front of the hospital, and note the satellite dish in the window. If you just move it with your hands, the guard can readjust it easily, so that won't do. But if you instead have a go at the dish with the Surgery Pliers, that keeps him occupied indefinitely. Unfortunately, Max refuses to either attack him with the Scalpel or lock him into the room by going inside and removing the wedge from underneath the one way door... so we'll need to enlist some aid from a different quarter to help put him out of commission.
Return to the back door of the hospital, and use the Stethescope on the pipe there. Hey, you can hear Nina talking in her sleep! Use the Ammonia Gas on the pipe, and then the Handheld Fan to disperse it. Nina wakes up and, better yet, you can now take control of her to work things from the other end :-) When you get control of Nina, have a quick look around. Note the rat hole. Hmm. Pick up the Crocheted Place Mat, the Bowl, and the Small Stone that is near the rat hole. Use the Crocheted Place Mat on the sharp edge in the bricks above the rat hole to unravel the place mat into a long Thread. Combine this Thread with the Small Stone to produce a Tied-up Stone, and what remains of the Thread becomes a Fiber. Then use the Tied-up Stone on the drain in the floor. Now you and Max can exchange small objects. Transfer control to Max. Use the Scalpel on the pipe to transfer it to Nina, then give control back to Nina. Use the Scalpel to saw off the plastic Chair Leg. Pass this item down to Max, who can then combine it with the Syringe to construct a makeshift Blowgun. Use this item with the Anesthetic to produce a Poisoned Blowgun. Now Max can finally go back inside and knock the wedge out from under the door. Once the guard is trapped inside, you can use the Poisoned Blowgun on the peephole in the door to knock out the guard once and for all.
On Nina's side of things, it looks like like we have the makings of a rat trap, but need some bait. Use the Scalpel again, this time on the mattress to cut off a piece of Foam. Transfer the Foam to Max, and have him dip it in the dish next to the guard's TV to obtain a piece of Cheesy Foam. While Max is here, also have him grab a Tack from the pinboard. Now go back outside and transfer the Cheesy Foam and Chair Leg up to Nina. Then take control of Nina. Combine the Cheesy Foam with the Fiber to make some Tied-up Cheesy Foam. Combine the Chair Leg with the Bowl to make a Rat Trap. Then combine this item with the Tied-up Cheesy Foam to produce a Rat Trap With Bait.
Note: this is the place in the game where North American players will not be able to proceed unless they have applied the version 1.02 international patch. You will not be able to use the rat trap you have just constructed. See the Tips section at the beginning of this guide for details.
Finally, you can use the trap on the rat hole, and... the rat somehow falls for it. Now comes the part where you really have to suspend your disbelief. When Nina lifts the sprung trap, this supposedly wild Rat magically appears in her inventory without trying to run away, bite off several of her fingers, etc. OK, we're past that now. Transfer the Rat to Max, then have him go inside and up the stairs to where Nina is being held. There's a second guard there. No worries. Use the Rat on the guard, and he runs off after it. Combine the Anesthetic with the Tack to obtain a Poisoned Tack. Use this item on the guard's abandoned chair (Max runs downstairs after the Tack is in place), then go back upstairs once the guard returns to find him passed out in the chair. Examine the guard's body to get the Key To Cell, and finally you can free Nina. Max and Nina rendezvous with Oleg at a nearby airstrip, but not in time to evade the authorities. Nina leaves the two lads to their own devices, and flees in a jeep to a place close to where her father set out on his last expedition...
Take the Spade from the back of the jeep. Use the Spade on the crate in front of the tent to obtain some Debris From A Crate. Have a go with the Spade at the nearby tree as well (my aren't we a destructive lass today?), and pick up the Bark that falls off. Note the tree resin we've exposed in the process, but we have nothing to put that in... not yet anyway. Enter the tent next. The old shepherd (Evenk) lying in the bed appears to be asking for medicine. He mentions something about parchment. Hmm. You can't pick up the snippets of parchment you find in the fireplace, for they are too fragile. Anyway, take the Grate, the Scissors, the Cup, and the Wooden Spoon (on the chest of drawers near the nutcracker/statue). Use the tassel above the shepherd to obtain some Twine. Go back outside and use the Cup on the tree Resin to collect some. Use the Bark on the barrel to connect it to the water basin (trough), then pull the plug on the barrel. When the reindeer comes over to take a long overdue drink, you can try using the Scissors to collect a fur sample, but they are too blunt. Go past the tree onto the path and pick up the Pointed Stone you find in the next scene. Use this item on the Scissors to make Sharp Scissors, then use these on the reindeer to get some Reindeer Hair, and combine this item with the Twine to make a Wisp Of Hair. While you're here, use the Cup on the water basin. It should now contain Resin and Water (but the inventory description hasn't kept up with what's actually in there). Go back past the tree onto the path, and put the Grate (grill) over the hole that is spewing forth sulphurous gases. Put the Cup onto the Grate, and the Resin turns liquid.
Go back to the tent, and combine the Wooden Spoon with the Wisp Of Hair. Nina throws in the bit of Twine as well, and you wind up with a Brush. Use the Brush on the Cup (that contains the liquid Resin) to obtain a Brush With Resin. Finally, you can use this item to restore the snippets of parchment in the fireplace and get the Recipe for the shepherd's medicine. The Recipe says: "5 parts of the Source of Life, 2 parts of Root of Tears, 1 part Blood of the Night, 3 parts Drops of Intoxication. To be taken shortly before it unites with the wind." Ah yes, perfectly clear :- Use the Recipe on the shepherd, and he at least gives you a Vial to act as a container for this eventual concoction. Now we just need to figure out what to fill it with... so go back outside and use the Vial on the water basin to fill it with water (5 parts of the Source of Life). Now examine the jeep, and you zoom into the front seat. Take the Ketchup and the First Aid Kit. Examination of the First Aid Kit produces a bottle of Vodka (obviously, the local translation for 'first aid'). Use the Ketchup on the Vial (1 part Blood of the Night). Then the Vodka (3 parts Drops of Intoxication). Return to the scene with the sulphurous hole, and use the Spade to dig up the Gentian plant. Pick up the Grate while you're there, and return to the tent. Put the Vial at the base of the nutcracker, then use the Gentian on the nutcracker (2 parts of Root of Tears) to complete the Recipe. Next, put the Debris From A Crate and the Grate in the fireplace. Place the Vial on the Grate. Then light a fire with the Matches you have been carrying around since you got here. Anytime after Nina figures out that she must take the Vial off the fire before it evaporates... well, take the Vial off the fire, and give it to the shepherd. He reluctantly tells you where to find the small cabin that your father began his last expedition from, and that is where Nina winds up next.
Enter the cabin. Pick up the Glass Shard from the floor, and the old Rag from the planter. You can try to look in the chimney (fireplace), but you will need a light source. Also, the projector won't run without electricity. Exit the cabin, and take the path around the back. Take the Hose from the water tanker, and the Oil Lamp that is hanging on a hook near the generator. Surprise, surprise. The generator needs fuel. Go back into the cabin, and look at the chimney again. Use the Matches to light the Oil Lamp. Now you can see and pick up a piece of Aluminum Foil. Also, use the Vodka on the Rag to obtain a Saturated Rag (note: if you already drank the Vodka while performing another task, you can instead use the Oil Lamp on the Rag to saturate it with fluid), and use this item to wipe the soot off the wall at the back of the chimney. Someone has written the following sequence of numbers there: 7 1/2 - 3 - 10 1/2 - 6. Hmm. Head for the back of the cabin once more, and take the path that leads to a small river (you can take another path to the north here too, and get a nice view of the research station). Examine the wheel rim on the truck wreck, and you obtain Two Nuts. The fuel tank also contains a small amount of diesel fuel, which we should be able to use for the generator. Use the Hose on the tank, then the Vodka on the tank (Nostrovia! Nina drinks the remainder of the Vodka before filling the bottle with diesel fuel). Use the resulting Bottle With Diesel fuel on the generator to get it powered up. Then use one of the Two Nuts you got from the truck wreck wheel rim on the generator's coil, and Nina holds them close to the coil until they are both magnetised.
Return to the cabin, and access the compass next to the fireplace. Think of the compass needle as being the same as the hour hand on a clock. Recalling the number sequence you read on the wall at the back of the fireplace, you have to move the needle to four different positions in sequence that correspond to where the hour hand on a clock would be at 7:30, 3:00, 10:30, and 6:00 respectively. Use one or two of the Nuts on the pins at the edge of the compass to determine where you want the needle to wind up next, then press the button in the middle of the compass to move the needle to that position. Once you've moved the needle to the fourth correct postion, a secret compartment opens above the fireplace. Examine the compartment and you retrieve some interesting documents, and a Film Reel. Nina pauses to read the documents, then you can use the Film Reel in the projector and... of course, the bulb in the projector has burnt out. That would have been too easy. Combine the Glass Shard with the Aluminum Foil to produce a gizmo that can reflect light, and use that on the projector. Now we need a light source. You notice that the window near the projector is filthy, so go outside and clean it with the Saturated Rag. Hey presto! Now you can view your father's film, and you see something strange happen to himself and Perez. Then Nina goes to investigate an explosion she heard outside, and all hell breaks loose. Nina and Oleg wind up in Havana in search of Manuel Perez, while Max goes to Ireland in an attempt to locate Ken Morangie.
Here you control Nina. Talk to the gate keeper. Well, about the only useful info you can glean from that conversation is that he likes to paint, and is on the lookout for new subjects. Enter the asylum through the front door, and talk to the fruitcake of a nurse (Sabrina) that is dancing behind the front desk. You learn that she ultimately wants to be a politician, and there is an election in only a few weeks time. Hmm. Take a Newspaper from the magazine stand, then the passage to the right that leads to a small room where one of the patients is building a house of cards. Talk to him, and you learn that every afternoon an "earthquake" knocks down his house of cards, and he's trying to finish it this time before that happens. Right... take the Glasses from the table next to the record player. Now go back outside and talk to the gate keeper again. He agrees to paint you a portrait of Nurse Sabrina if you get him some black paint... and if she'll stay still for a while. Enter the back of the asylum through the gate next, and talk to the worker. He'll only come off his break when black smoke emanates from the kitchen chimney. You are beginning to think that half the patients that should be in the asylum are actually on the wrong side of the wall here :-) After speaking to the worker, take a Log from the stack of wood behind him, then go through the door to the right to enter the kitchen. Pick up the following items (not sure you even need all of them, but what the heck): Meat Fork, Onion, Weights, Sausage Tongs, and Soup Ladle. Put the Log in the stove, then the Newspaper. Use the Glasses on the stove to light the fire (via concentrating the sunlight coming through the window). Then use the Sausage Tongs to pull a Charred Log from the fire.
Head back outside, and there is smoke coming from the kitchen chimney, but it's not black yet. Go back to the room where the patient is building the house of cards, and put the Weights on the record player. That ought to slow Nurse Sabrina down! Now give the Charred Log to the gate keeper, and he paints Sabrina for you, presenting you with a Wrapped Portrait. Show this item to Nurse Sabrina, and you now have a Portrait Of Sabrina and the Bag it was in. Put the Bag into the stove in the kitchen, and we have black smoke, plus our daily "earthquake" when the worker comes off his break and begins jack-hammering again. Now you can use the Portrait Of Sabrina on the copier in the room that our house of cards man has vacated to make her loads of copies. Might as well grab the Teddy Bear from the shelf of stuffed animals while you're here. Present the Copied Pictures to Sabrina, and now she owes you a favour. She opens the gate to the cells... but you soon discover that Perez is no longer in his cell! Have a look at the bed, from which you finally procure a picture of the fearsome Ms Charlesroi, and note the surveillance camera. You must also observe the blood stains on the floor, the tiles that fell out of the wall, and the scratches that are further up the wall before you are allowed to leave the cell. Go talk to Nurse Sabrina, to inform her that Perez is no longer in his cell. That gets Ramon moving. Also ask Sabrina about getting a look at the film in the surveillance camera. Then return to the courtyard, and note the door that Ramon keeps coming out of to dispose of dirty laundry. When ho goes back inside, combine the Meat Fork with the Portrait Of Sabrina, and use the resulting item on the door frame. Now once he goes back inside, the door stays open and you can enter the control room.
Have a look at the picture at the other end of the room. A pirate with one leg has a cat sitting on his shoulder. A parrot is perched on the cat, and there is a spider in the top corner of the picture. Hmm. Sounds like a plausible safe combination to me, based on the number of legs each creature has. So access the safe, and enter the combination: 1, 4, 2, 8. This nets you a Videotape, which you can play in any of the VCRs. It shows Ramon helping Perez to escape from his cell. Then Ramon enters the control room and confronts Nina. She talks him down, and he agrees to show her the cave where he has hidden Perez. Nina winds up there. You can't get anything directly out of Perez by talking to him, but if you go retrieve the Skewered Portrait from the door in the courtyard, and get another Charred Log from the stove in the kitchen, Perez will make a drawing for you when you hand him the Portrait Of Sabrina. Nina then texts a picture of this drawing to Max, and control transfers to him (all done with Nina for the moment).
Here you control Max. Enter the pub and talk to the barkeeper. Hey, I thought Irish people were noted for their warmth and hospitality. Well, this guy certainly bucks the stereotype. Take the Tumbler from the sleeping guest's table, and exit. Take the Flag that is hanging next to the front door, then cross the road and take the Sign. Go down the stairs and talk to the fisherman. He'll let you have the boat to take across to Ken Morangie's island, but only if you get him some whiskey first. Take a Fish from the barrel, surpised that he actually lets you. Take the Stone from the ground near the door. While you're here, use the Tumbler on the sea to produce a Tumbler With Water, and also use the Flag on the sea to obtain a Wet Flag. Go back to the pub. Now that you know about his whiskey cellar, you can try asking for some. He won't part with a bottle for any less than 1000. Anyway, put the Fish on the Sign. Then place this ensemble in the fireplace to cook the fish. Use the Wet Flag to remove the cooked fish from the fireplace, and present it to the guest. He wakes up when he smells the fish, but now he demands some lemon before he will eat it. Go back out to the road, and pace the Wet Flag over the traffic sign to hide the low speed warning. When you go back inside the pub, one of the delivery trucks passes by... too fast. Go back outside and retrieve the Lemon from the crate that fell off the truck. Present the Lemon to the barkeeper. He cuts it up and gives it to Klaus, who finally begins to eat the fish. The barkeeper goes over to keep him company, giving you a little more room for manoeuvre at the bar. Use the Tumbler With Water on the fireplace. When you take it back out of the fireplace and examine it, the water has now evaporated and you are left with some Salt. Use the Salt on the tumbler the barkeeper left at the bar and... that gets him out of the picture. Now you can take the Key that is hanging on the post at the bar. Use it to unlock the door to the whiskey cellar behind the fisherman. Take the Whiskey from the shelf, and the Torch from the pillar. Present the whiskey to the fisherman, and now you can use his boat to go to the island.
As soon as you arrive in Morangie's courtyard, you hear him calling out to you. He's trapped at the bottom of the well. There's a door down there that can presumably be opened from the other side, but he has no idea how you can get to the other side of that door. Here goes then... take the Sword that is embedded in the stone next to the well. From the courtyard, head for the door to the north. In the hallway there, take the Wire from the candle holder on the right-hand wall. Enter the passage there, and you find yourself in a torture chamber. Nice. Take the Pliers, and the Iron Chain from the wall by the doorway. Exit, and go into the next doorway in the hall. Looks like it's Morangie's bedroom. Examine the commode next to the bed. Max searches it to obtain a Gold Coin. Open the curtain on the far side of the room, and descend the stairs to the cellar. Looks like that may be the way into the well, but we need to find a way past two gates first. Go back upstairs and return to the courtyard. This time take the door to the northeast. A sitting room. Go up the stairs and take the Spearheads from the showcase. Look at the books just above. You read about William Morangie, whose ghost may be haunting this castle. You can pull the lever, but this action doesn't really accomplish anything useful with the chandelier yet. On your way back down, take the Oil Lamp from the banister at the top of the stairs. Return to the courtyard once more, and take the door to the east. It's the anscestor's tomb. Use your inactive Torch with the lit one on the wall here to obtain a Burning Torch.
Return to the torture chamber. Use the Burning Torch on the fireplace to relight the coals. Hold the Gold Coin with the Pliers, and use this item in the fireplace. Now use the Pliers With Red-Hot Gold Coin on the iron maiden to punch a hole in the coin, and you now have a Pliers With Red-Hot Gold Ring. Take this item back to the mainland (you get back to the boat by going south from the courtyard) and plunge it into the sea to obtain a Gold Ring (of course, if you had filled the Tumbler with sea water again, you could have used that instead, but hey). While we're here, go to the back of the whiskey cellar, and use the Pliers to prise the Long Board from the barrels. Use the Spearheads on the bench vice to improvise a saw, then use the Long Board on it to obtain a more easily transported Board. Now go back to the island and return to Morangie's bedroom. Use the Gold Ring on the statue. The first gate down in the cellar opens! Return to the bedroom again, and use the Sword on the statue. This opens the second gate in the cellar, but we still need to get the bridge down so we can have a look at what's in that niche in the wall... and you can also make out a third gate across the way. Go back to the courtyard and get the old wooden Shutter from a window. Using this item (it seems to suffice as a shield :-) on the statue lowers the bridge. Now you can go back down into the cellar and examine the niche in the wall, which reveals a small Key. Now we need to find a way to get the next gate open. Return to the sitting room and use the Board on the stool. Then use the Stone on the Board, and Max fashions a sort of crude catapult. Now when you go upstairs and pull the lever there, Max allows the chandelier to come crashing down, thus triggering the catapult. Something is launched out of the chimney and lands by the well. It's the Chimney Cover and... you guessed it. This works as the statue's helmet, and in the cellar another gate is opened. By the way, you probably noticed by now that it doesn't matter which order you place objects on the statue. Each object successfully placed simply removes the next obstruction in the cellar :-)
On the home stretch now. If you've observed the portrait of William in the sitting room carefully, it looks like all we need to complete his fine set of accessories is an amulet. Hmm. If you read the book about haunted castles that is in the shelf on the landing above above the sitting room, you learn that William was buried with an amulet. So let's go take a closer look at his coffin... use the Oil Lamp on the coffin to fill the grooves in the lid with oil. Then use the Burning Torch on the coffin to give William an after-the-fact cremation. Hey, it looks like you may have released his spirit in the process! The fire melted some wax to reveal an opening at the top of the coffin. Use the Key you found in the niche in the cellar on this opening. The coffin lid slides open. Take the Amulet and combine it with the Wire, and then the Iron Chain, to produce an Amulet On A Chain. Of course, using this item on the statue in the bedroom opens the final gate in the cellar! Now you can get to a large, circular door in the wall, but it won't open. Hmm. Closer examination of William's portrait shows that he appears to be wearing shin guards. Now... this is a nasty piece of puzzle design, and I spent a long time scratching my head and backtracking through all the scenes until I finally came upon two pieces of Rain Gutter that have conveniently fallen off the front of the pub *since you went to the island* (I double-checked by loading some saved games). Not nice, developers. Not nice at all. However... you can now use the rack in the torture chamber to separate the two pieces of Rain Gutter, then use these on the statue in the bedroom to unlock the circular door, and you finally come face to face with Ken Morangie. Whew! Another long exposition, some papers left by a deceased man named Evans, everyone returns to Berlin, and Oleg takes Nina to the Himalayas on the trail of another lead.
Examine the Message in inventory to read your father's travel journal. Note the strange drawing all the way at the back. Take the Skull, and you also get the long Peg that it was perched on. You can try putting the Peg into one of the three holes in the wall here, but nothing interesting happens and Nina removes the Peg. Take the passage into the next room. Note the skeleton down below at the base of the waterfall. Looks like there's something lying on the ground next to it, but you can see no apparent way to get down there. Use the Peg on the circular rock and you manage to dislodge it. The rock plugs the hole the waterfall is draining into, and a Bag floats to the surface. The Bag contains a... Bone. Hmm. Looks like it might be a key. Go back to the previous room. The Bone will stick if you put it into the bottom hole of the three. Hey, a passage has opened in the wall of the next room! Enter the newly exposed room and have a look around. Wow, symbols on the ceiling just like Perez drew, and reliefs on the wall that seem to depict the Tunguska incident. Examine the stone slab to kick off a puzzle. Remember the diagramme at the back of the travel journal? Well, you have to rearrange the stones to look like that. Here's the solution in case you need it (with the last stone about to be moved to the bottom left corner). When you examine the strange disk that is revealed by solving the puzzle, Nina gets a nasty surprise... and Oleg flies her off to another location, unconscious.
Fortunately, the piece of equipment that Oleg and Sergej are trying to use to freeze Nina with seems to malfunction. Nina is left on her own to slowly come around while the two of them go off to have a look. Take the Plunger, and the Toilet Paper from the dispenser near the door. Exit to the next room. Pick up the Metal Plate from the workbench. Also examine the armoire next to the workbench to obtain a Tapper, a Piece Of Something, and some Silicone. You can see an egg through the glass when you examine the incubator, but you'll need a combination to open it. Take the Key that is hanging next to the door. It won't open this door yet, because the keyhole is blocked with ice. Use the Piece Of Something on the bench vice to obtain a Bent Piece Of Something. Put the Metal Plate under the drill, then use the drill. Nothing much happens, but Nina notices that sparks are flying off. So put the Toilet Paper on the Metal Plate, then use the drill again to set the paper alight. Use the Bent Piece Of Something to hold the Key, and then use this item on the Burning Paper to heat up the Key. Now you can use it on the door to get through the frozen lock.
You wind up on a metal walkway high above the ground. Take the door to the left into a control room, and Nina spots Oleg, Sergej, and this Nicole Charlesroi person down below at the base of a huge machine. Hmm. There's an armoire here too, and you find an Explosive inside (something like a hand grenade, Nina reckons). That's about all you can do here for the time being, but note the VCRs underneath the plasma screen that is showing static. Looks like we need to find a videotape to play. Exit the control room, and go down the stairs at the other end of the walkway. Take the Fishing Rod then head back to the walkway. Use the Fishing Rod on the platform below, and Nina is able to retrieve some winter clothing (which she immediately puts on) and a Laundry Ball (some terrycloth bedding). Everything else on the platform is too heavy to pull up. Now that you're dressed properly for the Antarctic, you can go down the stairs and head outside. Take the Bucket, then head to the right to leave the area. You come upon an old whaling vessel that is stuck in the ice. Use the Laundry Ball on the barrel to obtain a Laundry Ball In Whale Oil. Nice one. Examine the jacket that is hanging up near the barrel and you discover a Hip Flask, but you can't get the cork out. While you're here, note the harpoon. But you don't have any potential targets... yet. Exit this area, then go to the other area all the way to the left. You spot a penguin standing there. Take the Sign that warns people about the crevasse, and as you do Nina has a look below and spots a body. I think it must have been the guy that Oleg caught sabotaging the machinery. Use the Explosive on the hole vacated by the sign, and Nina retreats to a safe distance. The resulting explosion provides Nina with a snow bridge down to the body. You retrieve an Amulet (looks like the kind that black-robed sect wear. Was this guy a member?), a Lighter, and a Diary. The Diary turns out to be an excerpt from Nicole Charlesroi's notes. Interesting... well, that's all we can do outside for now. So head back to the station.
Return to the room with the drill, and place the Hip Flask on the Metal Plate under the drill. Use the drill to pull out the Cork. Damn! Nothing inside the flask... but you can use the Cork on the bathtub next door to plug the drain. Now we just need to find a way to fill the bathtub. Go back to the walkway, and throw the Laundry Ball In Whale Oil onto the elevator platform below. Go down the stairs again, and now you see that you've managed to produce a huge Salt Pile. Use the Bucket on it to obtain a Bucket Of Salt. Now, let's go find some ice to melt, shall we? Head for the whaling vessel, and use the Bucket Of Salt on the hole in ice. Nina comments that it may take some time for the salt to melt the ice, so go back into the station, then return... and the ice has melted. If you now try to use the Fishing Rod on the hole in ice, Nina comments that you need some bait. So combine the Fishing Rod with the Lighter and go fishing with that. You manage to land a Fish in pretty short order. Feed this Fish to the penguin, and it leaves its egg to go feeding... but won't let Nina take it. Examine the egg, and you find that it's made of metal! Hmm. Maybe we could find a way to get the egg out of the incubator back in the station to replace this one with? Indeed. Use the Plunger on the incubator to prevent the glass from falling on the egg, then cut a hole in the glass with the Amulet (remember, there's a diamond at the top of the Amulet). Now swap the strange Egg you just obtained with the object the penguin was sitting on. Take this "Egg-shaped Metal Object" back to the station and put it into the machine (next to the Salt Pile) to get the pump running again. The water begins to heat up, and now you can fill the bathtub. Once that is done, go back to the machine that is heating the water and remove the egg. When you return, the bathtub is frozen over and Nina can use it to reach the surveillance camera, from which she retrieves a VHS Tape. Put this into one of the VCRs back in the control room and watch the show...
Now you can access the keypad on the walkway, but what could the combination be? Hey, you just watched a video of Charlesroi meeting Gartuso on the walkway, didn't you? Right. Look in Nina's journal, and you see a close-up of the scene with the code: 2513. Enter that sequence into the keypad and you get a bridge over to the door. Once inside, have a look at the radar screen, and Nina spots what looks like an airplane approaching. Could be our means of rescue! Take a Beacon (flare) from the crate on the floor, and Nina also grabs some Matches. Then head for the whaling vessel. The Beacon won't light because the fuse is wet, so use the Beacon on the barrel there to coat the fuse in whale oil, then you can use the Beacon on the harpoon to attract the attention of... Max! Another long exposition follows, Max and Nina become separated, and you control Nina who can now take the elevator to go down below.
Use the Sign on the Icicle to knock it off the ceiling. Then enter the door at the end of the hallway. Note the danger sign on the shelves next to the barrel. Use the Silicone on it to obtain a Mold of the sign. Take the Wrench from the barrel while you're here. Anyway, we now know that the barrels here contain a substance that is explosive when mixed with water. And, by examining the wall of ice, we now know that this whole place is below sea level, and that there's a breach in the wall. Hmm. Use the Icicle on the chain that is hanging from the ceiling, then attach the chain to the pipe near the door. OK. We now have a disaster waiting to happen if we can just get some heat into those pipes. Before you leave the room, note that a nut fell off the pipes when you lodged the icicle there. Pick up this Nut. Now exit, and use the Tapper on the valve next to the large wall radiator to thread the rod. Put the Nut on it, then use the Wrench on the Sign to produce an Extended Wrench. Use this item on the valve/nut to open the valve. Darn, the radiator is still cold! So use the Mold on the surveillance camera to signal to Max that you have "no water". He takes the hint and sends some your way. Now water is flowing throught the pipes, but the radiator is still cold. So hold the Lighter up to the surveillance camera, and voila, Max supplies some heat. Then Oleg shows up.
Gartuso explains his plan for world domination. Now you need to find a way to create a distraction so you can escape before that icicle melts. OK... so give the metallic Egg (the part for the water pump) to Oleg, and that gets rid of him. Then use your Cell Phone on the large (but delicate!) machine to knock it out of whack. Now with everyone's attention sufficiently diverted, you can grab the camera next to Nina. Use it on the overhead crane to suggest your escape route to Max. Now all hell breaks loose, and Nina just barely manages to make it out of there. Game over, and be sure to watch the credits for some humourous outtakes done 'in character' :-)
See the metzomagic.com Review of Secret Files: Tunguska.
Copyright © Steve Metzler 2006.
All rights reserved.
|